

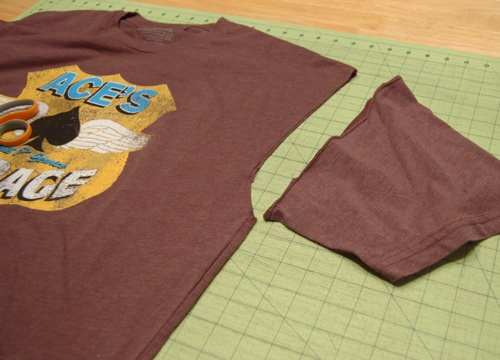
CUTTING YOUR T-SHIRT APART
Completely separate the sleeve from the shirt body
You do not need the sleeves for this project

The shoulders and collar are joined with a seam that runs across the top of the shirt. Cut these seams.

Split the shirt down each side from the armpit to the bottom. You should now have 2 pieces: Front and Back

Fold the front and back of the shirt in half. Be sure to take time and center your image. Do the same for the back. If your back does not have an image on it you can save time by laying the front folded fabric on top of the back folded fabric - if your back has an image on it cut each piece separately.

Place the pattern piece on the fold and make sure to center your image - try to avoid placing the V (cami) or top edge (tube top) on any ink.
Cut the front and back of the shirt. I like to cut the bottom of the shirt off first and save the scrap for a different project or for a bottom band if I want to add one ***this pattern does not include the band because it's a little more difficult to sew on with a regular sewing machine - if you want to add one just cut a 6 inch wide strip and make it about 4-5 inches shorter than the width of the bottom edge of your shirt. Ease the band into the bottom edge by pulling a little while you sew it to the bottom - to attach it use a straight stitch and then a zig-zag stitch along the sewn edge.

Cut 2 strips of stretch lace or fold-over elastic for shoulder straps in the following lengths (Cami Only):
Small: (2) 17 inch strips
Medium: (2) 18 inch strips
Large: (2) 19 inch strips
SEWING YOUR SHIRT
The following instructions apply to the cami corset only

Take your stretch lace or fold-over elastic and sew it across the V-neckline slightly pulling evenly while you sew.

If you're using stretch lace use a zig-zag stitch along the upper edge and then go over it again with a straight stitch along the bottom edge of the lace. If you're using fold-over elastic you can use a straight stitch.

Do this for the front and back pieces.

Here's an example of how it should look like on the other side of the fabric.

Fold your fabric with right sides facing each other and pinch the V-neck.

Sew in place just on the center front- only do this step for the front.

Take each shoulder strip that you cut earlier and attach one side of the strip to the front armhole edge of the shirt. Only stitch where there's fabric.

When you get to the top of the armhole where it meets the V-neck back-stitch to secure your thread and grab your back piece. Do the same step to the back piece. Be very careful not to twist you strips when you sew each pattern piece to the lace/elastic.


Place the right sides of the front and back facing together and sew the side seams. There is a 1/4 inch seam allowance included. Use a regular straight stitch on each side - make sure to back-stitch the top seams so that you secure the fold-over elastic/lace. This is where the most stress is so make sure you have securely sewn the seams to avoid it tearing on you while you're wearing your top.

Finish your edges with a zig-zag stitch. Back-stitch at the underarm seam to secure your thread.

Split the back of your shirt down the center.

Usually you will be able to see a crease from when you folded in in half to cut it earlier.

Hem the bottom of your top using a 1" hem allowance. I would recommend using a zig-zag stitch. Press your seam.

Fold the center back edges in 3/4 of an inch and stitch (zig-zag).

Remember to press both your hem and center back edges

Grab your grommet tape and cut one of the ends in the center between two grommets. Lay over your shirt to determine the length you need and cut the other end the same way

Pin your grommet tape onto the center back edge and tuck the ends under themselves by about 3/8 of an inch.

Make sure you count the grommets and have an equal number on each side. Use a zig-zag stitch across the top, sew down the inside of the seam and finally across the bottom edge. I use a universal sewing machine foot but some people prefer to use a zipper foot for this step. If you choose to do so make sure you use a straight stitch instead of a zig-zag to avoid accidentally breaking your needle on the zipper foot.

Cut all loose threads and use the 3 yards of satin lace to lace up your corset!

Burn the edges of your satin lace so they don't fray - you barely have to touch it - just make sure the ends melt just a little bit.
For this last step make sure you're in a well ventialated area and that you have plenty of water handy in case you light something on fire. Also, watch your fingers - it's easy to burn them!
If you're under 18 please get a parent to help you do this.

***If you just want a cami or tube top but no corseting just ignore the steps where you cut the shirt down the center back and add grommets. All other steps are the same.
If you have questions please feel free to leave a comment and I'll try to answer as best I can - feel free to help each other through the comments in this post :D
Have fun! Send me pics!!!
